Vintage Autumn Library Cards Free Printable PDF
Autumn Library Cards for Cozy Seasonal Crafting
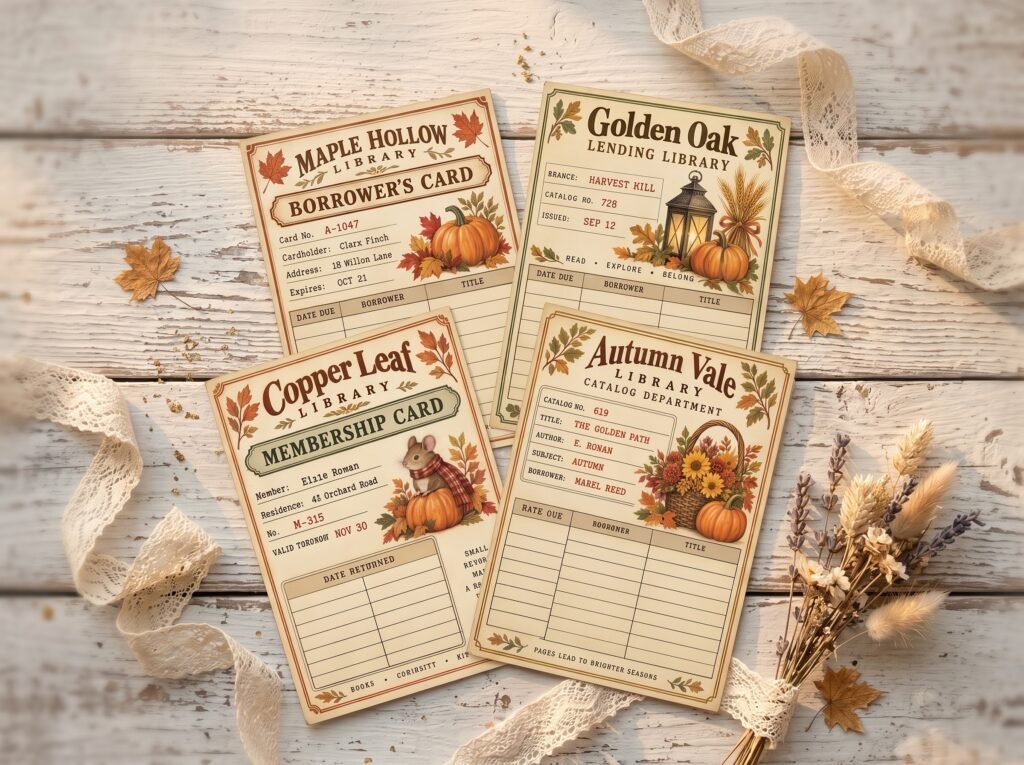
Bring the warm, nostalgic feeling of an old-fashioned lending library to your autumn paper crafts with these charming autumn-themed library cards. Each card features a different vintage-inspired library design decorated with pumpkins, colorful leaves, harvest flowers, wheat, a glowing lantern, and an adorable little mouse bundled in a cozy scarf.
This post contains affiliate links and I will be compensated if you make a purchase after clicking on my links.
With their warm cream backgrounds and beautiful shades of pumpkin, rust, golden yellow, brown, and olive green, these cards are perfect for adding a cozy seasonal touch to your creative projects.
Fun Ways to Use Your Autumn Library Cards
- Junk journals: Tuck a card into a pocket, attach it with a paper clip, or glue three sides to a journal page to create an extra pocket.
- Reading journals: Record the title, author, date finished, favorite quote, and your rating for each autumn read.
- Blind Date With a Book: Include a card with a wrapped mystery book. Write a few clues about the story without revealing the title, or invite the recipient to record their thoughts after reading it.
- Happy mail: Add one to a letter or seasonal care package as a cheerful surprise for a friend or pen pal.
- Flat mail: Because the cards are lightweight and easy to tuck into an envelope, they make wonderful additions to decorated flat-mail packages.
- Pocket fillers: Slip them into library pockets, loaded envelopes, flipbooks, folios, altered books, or handmade journal pockets.
- Bookmarks: Use the cards as decorative bookmarks, or add a ribbon, lace, or tassel at the top.
- Journal cards: Use the lined areas for journaling, prayer notes, gratitude lists, favorite autumn memories, or seasonal bucket lists.
- Gift tags: Write a personal message on the back and attach a card to a wrapped book, hostess gift, or autumn care package.
- Pen-pal swaps: Decorate the cards with stamps, washi tape, stickers, lace, or handwritten notes before exchanging them with another paper crafter.
- Scrapbooking: Use them as photo mats, journaling spots, page accents, or memory cards for fall photographs.
- Book-club treats: Add one to each member’s book, snack bag, or meeting favor for an extra-special seasonal touch.
You can use the cards exactly as they are or personalize them with inked edges, ribbon, lace, stamps, stickers, eyelets, charms, or tiny handwritten messages. Print them on sturdy cardstock for standalone cards and bookmarks, or use regular paper when layering them into journals and collage projects.
Whether you are preparing a cozy Blind Date With a Book, filling a junk journal pocket, or sending a little autumn happiness through the mail, these library cards offer so many delightful possibilities. Print, cut, decorate, and enjoy making each one uniquely yours!
How to Print Your Library Cards
For the best results, download the PDF to your computer and open it with the free Adobe Acrobat Reader. Avoid printing directly from your internet browser, as browser print settings may resize the page.
- Load 8.5 × 11-inch Canon Matte Photo Paper or bright-white cardstock into your printer. If your printer has a rear paper tray, use it for thicker paper.
- In Adobe Acrobat Reader, select Print or press Ctrl + P.
- Choose your printer and confirm that the paper size is set to Letter—8.5 × 11 inches.
- Under Page Sizing & Handling, select Actual Size. Make sure the scale shows 100%. Do not select “Fit” or “Shrink Oversized Pages,” because these settings can change the finished size of the cards. Adobe confirms that “Actual Size” prints the PDF without scaling. Adobe printing guidance
- Select Portrait orientation and print one-sided.
- Open Printer Properties, Preferences, or Print Settings to choose the correct paper option:
- For Canon Matte Photo Paper, select Matte Photo Paper as the media type and choose High or Best print quality.
- For bright-white cardstock, choose Cardstock, Heavy Paper, or the closest compatible setting offered by your printer. If none is available, use the setting recommended for your cardstock’s weight.
- Make sure Borderless Printing is turned off. The printable includes its own white margins and cutting space.
- Check the print-preview window to make sure the entire page is visible and nothing is being cropped.
- Print one test page before printing additional copies.
Allow the ink to dry completely before cutting, especially when using matte photo paper. For clean edges, trim the cards with a paper trimmer or a sharp craft knife and ruler.
Helpful tip: Print on matte photo paper for rich colors and crisp decorative details. Choose bright-white cardstock when you want sturdier cards for bookmarks, journal pockets, happy mail, flat mail, gift tags, or Blind Date With a Book projects.